3.30.2013

Taco Soup Recipe

Ingredients:
1/2 lb. extra lean ground beef( the original recipe calls for 1 lb. I prefer 1/2 lb.)
1 envelope taco seasoning (I use mild)
1 (15 ounce) can corn with juice
1 (15 ounce) can red kidney beans with juice
1 can sliced olives (or buy the whole olives and slice them)
1 (15 ounce) can tomato sauce
1 (11.5 ounce) can tomato juice
1 (15 ounce) can diced tomatoes
Optional - 1 onion diced

Instructions:
Brown ground beef (with onion if desired).  Drain.  Add to other ingredients and simmer.  I have found that if I let it simmer for the afternoon, it is very well mixed.  You may need to add a little water to taste if you prefer a thinner soup.  This recipe has lots of flexibility in it to make it just the way you prefer.  Serve with grated cheese and tortilla chips.  My kids also love cornbread with Taco Soup!

-->

3.29.2013

Favorite Easter Picture Books

We love visiting the library and picking out picture books for each for each holiday. Below are a few of our favorite Easter picture books that we picked up at the library this year. Some are secular, and others are religious, but they were all fun books with great values and good stories. Happy Easter and Happy Reading!


Rechenka's Eggs by Patricia Polacco
This Russian tale is of Babushka who cares for a wounded goose during the winter. She also spends all winter painstakingly painting eggs for the spring, but when the goose accidentally breaks all of the precious eggs that Babushka had painted, the goose magically gives Babushka even more beautiful eggs in return.

The Country Bunny and the Little Gold Shoes  by Dubose Heyward/Marjorie Flack
This is a classic book about a little girl bunny who longs to be the Easter Bunny, but she is told she never could do it because she isn't as big and strong as the male Jack Rabbits. She grows up to be a mother of 21 little bunnies and she shows everyone that as a mother she is strong, fast, and clever enough to be an Easter Bunny. Most important, she shows she has a heart caring and brave enough to be the Easter Bunny.

The Easter Story  by Brian Wildsmith
This book has the true story of Easter told from the point of view of a donkey. The illustrations are big and beautiful, and it can be a good supplement to reading the Easter story from the Bible.

The Legend of the Easter Egg  by Lori Walburg
This is a sequel to one of our favorite Christmas books The Legend of the Candy CaneIt is a bit more sad--as it tells how a brother has to leave his family for a few weeks while his sister is quarantined because of sickness. But through the book, he discovers the joy of spring, of the true Easter story, and the new hope that Easter brings. I love how the symbolism of the egg is shared. After reading this book, our own egg dyeing seemed to take on a bit more meaning.

The Tale of Three Trees: A Traditional Folktale by Angela Elwell Hunt/Tim Jonke.
This book tells how three trees imagine the great things that they want to do. None of their dreams happen as they plan, but instead they find even greater joy because they all play a part in the life of Jesus Christ. One tree ends up being the manger, another is a fishing boat, and the third is the cross. We love the message of this book and we read this book at both Christmas and Easter.

The Easter Egg by Jan Brett
If you are a fan of Jan Brett's detailed and beautiful illustrations then you will enjoy this Easter themed book in which a bunny searches for the perfect way to make an Easter egg. In the end, the bunny helps out mother Robin by guarding a real live egg. My kids loved all the varieties of eggs shown in this book--wooden, chocolate, painted, mechanical, etc.

Easter Parade  by Irving Berlin/Lisa McCue
This is an illustrated version of the classic Easter Parade song. Different animals are shown dressed up and parading around in the book. It is a short and fun book for young kids. We also always like to have our own "Easter Parade" around our house while marching to the song. (We got our version of the book from the local library--it does look like it's out of print so if you want to buy it, you'll have to get a used copy).

Do you have any other favorite Easter picture books? We'd love to hear your comments below? Also, don't forget to check out all of our Easter activity ideas here.

-->

3.28.2013

Easter Fun: Peep Wars!


When my husband first told me about "peep wars" he used to have at Easter time, it was a foreign concept to me. I grew up with mostly sisters, and we just didn't play the same way that brothers do. But now that I am a mom of two boys, I know that they never turn down an opportunity to have a little friendly competition. So now we let our boys do their own "peep wars" with our candy peeps that we get at Easter time.

To play, each competitor places a toothpick "sword" in the front of his peep. You then place the peeps facing each other on a plate and microwave the peep for thirty seconds. The marshmallows expand, and the winner is the one with the peep that is speared the least or the peep that remains the most intact and upright at the end. (Judging is very subjective).

It's silly and simple--but a lot of fun for young boys :)


Has anyone else heard of "peep wars" or this something bizarre that my husband's family made up? What other silly or fun Easter traditions do you have?

Don't forget to check out all of our Easter ideas here!

-->

3.27.2013

5 tips to making Easter Egg hunts more enjoyable for everyone!


1.  Color Coordinate: A fun idea to ease your Easter morning is to request that the Easter Bunny color coordinates your Easter baskets!  Each child puts their baskets out the night before. The next morning, whatever color of grass, tissue or crinkly paper is in their basket, is also the color of plastic eggs they can gather around the house.

This makes for a fun activity for the kids to each find their own eggs in their own time without worrying that child who takes their time and enjoys the moment will miss out on finding more than just a couple of eggs.  My kids love it!

2. Community or Cousin Egg Hunt: You don't have to only attend city egg hunts with thousands of kids.  We love more intimate neighborhood, cousin or cul-de-sac egg hunts.  Have every family bring a dozen filled plastic eggs per child they are bringing.  Then the parents each hide the eggs they brought in the designated hunt area.  The kids get to run out and find a certain amount of eggs.  This makes it fun for everyone and a lot simpler to organize!


3.  Alternatives to Candy: Hide money in eggs or even small erasers, bouncy balls, and small trinkets to avoid too much candy. We usually hide coins, even gold dollars, which makes it fun to see what you've earned.  One year, my in-laws hid dollar bills for the adults and then a select number of 10s and 20s.  It was a fun surprise, but warning it gets a little competitive with adults!

4.   Headstart for the Youngsters: Give the younger kids a head start so they don't get trampled over and so they can get the easier eggs up front.  I've also seen where areas are roped off for certain age groups.

5.  Throw in some prizes to shake it up a bit: Have a grand prize egg, make it golden or unique in some sort of way.  I have also seen where you put a slip of paper inside certain eggs that says "redeem for a prize".  Then you can have a prize table where there are various larger prizes from the dollar store for the child to choose from.

-->

3.26.2013

Favorite Pancake and Waffle Recipes


These are very basic recipes--but both are favorites with my kids! We don't just have these for breakfast--we often have pancakes or waffles for dinner, too. Top them with some fresh fruit to make them extra delicious. These recipes easily serve my family of five with leftovers.


Pancakes

Ingredients:
  • 2 1/2 c. flour
  • 2 T. baking powder
  • 2 T. sugar
  • 1 t. salt
  • 2 eggs
  • 2 c. milk
  • 1/4 c. vegetable oil
Instructions:
  • Mix together and bake on hot griddle. Don't over mix the batter. It should be slightly lumpy if you want thick pancakes. If you mix the batter until it is completely smooth, your pancakes will be much thinner.
  • Variations: For healthier pancakes, you could use whole wheat flour or half whole wheat/half white flour. You could also add blueberries to make blueberry pancakes or use food coloring to change the color of the pancakes for a holiday (i.e., green for St. Patrick's Day).
Waffles

Ingredients:
  • 2 1/2 c. sifted all-purpose flour
  • 4 T. sugar
  • 2 t. baking powder
  • 1/2 t. salt
  • 3 eggs
  • 2 c. milk
  • 1/2 c. vegetable oil
Instructions:
  • Sift together flour, sugar, baking powder, and salt.
  • In a bowl, beat the eggs, add the milk, and then add the sifted dry ingredients.
  • Cook your waffles following waffle maker instructions.

-->

3.25.2013

A Mom's Best Friend: The Little Green Machine and tricks for getting stains out!

Having either one of these:


Meant, I needed one of these:


as we call it, is my favorite friend.  I am ONLY sharing this product because it is tried and tested time and time again with my kids and my dog.  Remember the post about my 2 year old and his terrible messes?  This is the only thing that got the stains out of the carpet.

Friends came sledding the other day and tracked mud in the house.  This got the mud out.

Our dog's accidents are perfectly cleaned up by this.

2 year old potty training had an accident in bed.  This did the job.

My sweet boy carried his syrupy plate to the dishwasher, but spilled on the carpet on the way.  Completely got the sticky syrup out!

It is amazing.  It comes with a product, but even with warm water, this machine does a great job at getting deep into the carpet and stain.  When studying stains, the most important thing I found is to take care of it immediately (which I couldn't always wait for a carpet cleaner) and use water as much as possible.

So, if you are like me and have battled stains, I wanted to share my find with you. Because I only wish I had found it sooner!

Nothing has worked as consistently and effective for me than this machine, but also note that many everyday household products can help with stain removal too:
Nail Polish Remover
Rubbing Alcohol
(can bleach if your carpet is too dark, but it works well with darker stains like red things)
Vinegar
Dish Soap/Liquid Laundry Soap
(and you can try dish soap back and forth with vinegar)
Club Soda
hydrogen peroxide
Ice
Hairspray

Here's a great source I've found online that gives tips for stain removals

No stain remover will get out every stain, since every stain is different.  You may have to use more than one product or apply products more than once.  The MOST IMPORTANT THING is to treat the stain immediately. And for most stains acting quickly and water will do the most help to getting it out.  (That's why I like my little green machine, even without product, but simply warm water.)

Also, make sure you are not just cleaning the surface or it will return a few days later.  If you don't have a machine like me to do this trick, after you use warm water to remove the stain, use a towel to soak it all up, even putting something heavy on it over night to make sure it all comes up.


-->

3.23.2013

Rainy Day Fun: Cardboard Box Puppet Theater


The other day it was pouring rain, so our plans to go out were cancelled. Instead my kids decided to make a little puppet theater out of a piece of cardboard. All we did was cut a hole in the center of one side of what was left of an old cardboard box. Then the kids decorated the cardboard frame to create a puppet theater. I set up the theater on a table and draped a blue sheet behind it as a backdrop. It was a little unstable (because we didn't have the back to the cardboard box), but I just taped it down to the table while we were playing with it, and that worked. Then the kids took turns putting on shows. It was a fun collaborative project that all three of my kids enjoyed creating and playing with. This puppet theater wasn't as elaborate as the fabric theater I made for my kids a couple of years ago, but it did have an advantage in that it was small and portable. It may not last forever, but it was certainly a fun project to keep us all busy and happy on a rainy day.  (Want more ideas of what to build out of a cardboard box?  A fun and creative read is Christina Katerina and the Box!)

Return to D.I.Y Crafts
-->

3.22.2013

D is for Dinosaur Lesson Plan #2

The happy Dinosaurs
Their favorite thing to do - ROAR!!!

Dinosaurs are always a fun and popular theme. For preschool, we:

  • Traced the letter D
  • Turned ourselves into dinosaurs by making headbands and giving our names "osaurus" suffixes!  I found free clipart of a dinosaur online.  There were so many to pick from like these.  Then I copied them onto tan cardstock.  I cut a headband about 1 1/2" tall x 11" wide for the kid's heads.  If their heads are big enough, you may have to cut two of these and staple them together.  Then fit the headband to the size of the child.  The kids colored the dinosaurs, then we glued them on the headband and placed it on their heads.
  • Had Calendar/Weather Time with singing, counting, and birthday recognition
  • Talked about the letter D and what words start with D (some ideas were dad, dude {thank you to the boys}, donut, doll, donkey, dog, doctor and dinosaur)
  • Graphed our favorite dinosaurs as a group
  • Talked about the different kinds of dinosaurs and then counted them (plastic figurines) and sorted them into categories by colors and features
  • Had a fun flannel board story about 5 little dinosaurs that eventually all went away...

    Five Crazy Dinosaurs
    5 crazy Dinosaurs sweeping the floor
    1 got swept away, then there were four
    4 crazy Dinosaurs chased by a bee,
    1 got stung, then there were 3
    3 crazy Dinosaurs playing with glue,
    1 got stuck, then there were 2
    2 crazy Dinosaurs out for a run
    1 fell down, then there was 1
    1 crazy Dinosaur acting like a hero
    He went out to save the others, then there were zero

  • Learned just how big a dinosaurs mouth is, hunted for his teeth, counted his teeth, got eaten up and promptly pulled out all his teeth! (The kids predicted how big the mouth of the T-Rex was. Then we had to find out... They went on a hunt for all of his teeth and placed them inside this mouth. They climbed inside his mouth and realized just how big a dinosaur's mouth was. They were really funny. The kids got really excited about how much money T-Rex would earn from the tooth fairy for all those teeth!)
  • Happily learned what the word extinct means :)
  • Made a Stegosaurus out of the letter D (I cut out large letter D's out of green cardstock.  Then I cut out rectangles and triangles and ovals out of 2 different shades of green cardstocks.  The kids made patterns for the triangles and rectangles for spikes and legs.  The ovals were the head and tail.  We finished by gluing on a googly eye and glued everything to a tan piece of cardstock.)
  • Practiced our patterns with the triangles on the Stegosaurus
  • Reviewed our shapes with our Stegosaurus
  • Had a dinosaur dig with cracker crumbs, gummy dinosaurs, and dinosaur eggs.  You could have the dinosaur eggs be any round candy.  There are some really cute nerd candies that are chewy and just the look of dinosaur eggs! (This was the most popular event of preschool - the dinosaur dig for snack time. The kids each got a bowl of "dirt" (graham cracker crumbs) to dig for dinosaurs and dinosaur eggs. They got "shovels" (spoons) and brushes (paint brushes) to dig away and find 10 dinosaurs and 5 eggs. They loved it and when they were all done, they wanted to do it all again.)
  • Learned what a paleontologist is while doing the dinosaur dig
  • Read several "How do Dinosaur" books by Jane Tolen like How Do Dinosaurs Say Goodnight? and How Do Dinosaurs Eat Their Food?.
  • Acted out a dinosaur's typical day - stomping, chomping, roaring, swimming, sleeping
  • Sang oodles of songs... I posted them below the pictures
  • built a dinosaur village with blocks and plastic dinos
  • Sang lots of songs:
Triceratops
(Sung to: Three Blind Mice)
Look and see. One, two, three.
Count with me. One, two, three.
Triceratops has three big horns.
That's the way that he was born.
One, two, three. One, two, three.

Hiding Dinosaurs
Dinosaur, Dinosaur, where can you be?
Hiding behind me (hands behind back)
Where you cannot see,
Now you see one. (Bring out one hand)
It's waiting for you.
Here comes another, (bring out other hand)
And now you see two!

Dinosaur Stomp
(sung to "Glory, Glory Hallelujah")
I love to stomp and chomp and romp throughout the land
Oh, I love to stomp and romp throughout the land
How I love to be a Dinosaur

Sleepy Dinos
(To the tune of See the Bunnies Sleeping)
Sleeping Dinosaurs, Till it's nearly noon,
Come let us wake them, with a merry tune
Oh so still, Are they ill?
Wake up little Dino's! (Shout)
Stomp Little Dino's (stomp on the ground)
Stomp, stomp, stomp (stomp on the ground)
Stomp Little Dino's (stomp on the ground)
Stomp, stomp, stomp (stomp on the ground)
Stomp little Dinosaurs (stomp on the ground)
Stomping, and stomping and Stomp and Stop

Dinosaurs, Dinosaurs
(Sung to "Row, row, row your boat")
Dinosaurs, Dinosaurs Eating fruits and leaves
Take a bite, chew it up and spit out the seeds (Make spitting sound)

Dinosaurs of Long Ago
The Dinosaurs lived long ago,
And walked like this, and that. (Walk heavy like Dino's)
Some were large (Stretch arms apart.)
And some were small. (Squat down.)
Some liked water (Swimming motion)
And some liked land (Stomp feet.)
Some had wings that flapped and flapped. (Flap arms)
Some had long necks that stretched and stretched (Put hand above head)
The meanest, rudest one of all was ferocious Tyrannosaurus Rex
These were the Dinosaurs of long ago.
Goodness gracious! Where did they go?

Dinosaurs Lived Long Ago
(sung to "London Bridge is Falling Down")
Dinosaurs lived long ago, long ago, long ago,
Dinosaurs lived long ago, That's prehistoric!
Tyrannosaurus was very mean, very mean, Very mean,
Tyrannosaurus was very mean, That's prehistoric!
Brontosaurus was very big, very big, very big,
Brontosaurus was very big, that's prehistoric!
Stegosaurus wore heavy spikes, heavy spikes, heavy spikes,
Stegosaurus wore heavy spikes, that's prehistoric!
Triceratops had big sharp horns, big sharp horns, big sharp horns,
Triceratops had big sharp horns, that's prehistoric!
Pterodactyl could fly in the air, fly in the air, fly in the air,
Pterodactyl could fly in the air, that's prehistoric!
All the Dinosaurs disappeared, disappeared, disappeared,
All the Dinosaurs disappeared, that's why their prehistoric!

See more ideas from Rachel's Dinosaur Lesson Plan she posted previously.

Return to Lesson Plans
-->

3.21.2013

Homemade Raspberry Ice Cream Recipe


Our favorite dessert is ice cream. And the best time of year is starting soon--when the berries are season and often on sale. Below is a delicious raspberry ice cream I made recently. We topped it with blueberries and it was perfect!

Homemade Raspberry Ice Cream


Ingredients: 
  • 1 pint fresh raspberries
  • 1/3 c. sugar
  • Juice of 1/2 lemon
  • 2 c. whipping cream
  • 1 c. sweetened, condensed milk, cold
Instructions:
  • Combine the raspberries, sugar, and lemon juice in a mixing bowl. Cover and refrigerate for 1 hour.
  • Whisk together the whipping cream and sweetened condensed milk until well blended.
  • Mash the raspberries to a puree and stir into the whipping cream/sweetened condensed milk mixture.
  • Transfer mixture to your ice cream maker and freeze following the manufacturer's instructions.
I have the Cuisinart 1 1/2 quart ice cream maker and it is so easy to use--you just freeze the bowl ahead of time, and then throw your mix into the bowl, put in the dasher and top with the lid, and then turn it on. In 20-30 minutes you have delicious homemade ice cream!

Return to Recipes


-->

3.20.2013

Easter Bunny Treats for Home or Class Parties!

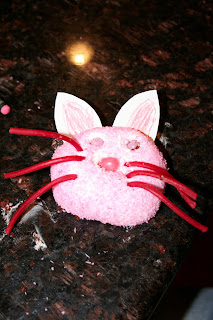
My kids loved making these cute Easter bunny treats.  They are great for a family party, Easter dinner dessert or class spring and Easter parties.

Supplies needed:
Pink Snowballs (get these ahead of time!).  
If you can't find them at the grocery store, you can always look at gas stations.
Pull and Peel Licorice
Jelly Beans
M & Ms
White Cardstock Paper
Pink Crayon
Scissors

Directions:
1. Cut bunny ear shapes out of the white cardstock paper
2. Fill in the bunny ears with pink crayon
3. Poke bunny ears into the pink snowball to look like ears 
4. Cut pull in peel into 6 equal strands (I cut 3-4 strands out of one length of a pull and peel)
5. Press 6 pull and peel pieces into snowball to look like whiskers
6. Press jelly bean (pink is cute, but others work too) into the center of the snowball for a nose.
7. Press 2 M & Ms in the snowball for eyes.  You could use other round pink candy as well.

See all of our Easter ideas here!

-->

3.19.2013

10 April Fool's Day Tricks and Activities for Kids

I never actually liked April Fool's Day when I was growing up. I'm so trusting that I often am the one who gets fooled on April Fool's Day. So I don't like pulling pranks that might make someone feel embarrassed or hurt someone's feelings. But I have learned to embrace the silliness of this holiday with my kids. Below are some lighthearted April Fool's tricks and activities that we have done.


*Brown E's: Trick your child by asking them if they want brownies. Then, pull brown paper E's out of the oven. (I got the inspiration for this trick here).
My kids were definitely fooled with this trick last year and were sad that they weren't actually getting treats--but after a few minutes, I consoled them with some real brownies I had made as well.

*Jell-O Juice: Serve your kids "juice" with a straw. They will be very confused when they try to drink it and find out that it is actually Jell-O. See this trick and fun April Fool's pranks and party activities on our previous post here.

*Canned Treats: Fool your kids into thinking they are getting a can of fruit, only to have them open it up and find a treat inside the can instead. See how to do this can trick here.

*Mixed up Dinner: Serve "dessert" for dinner and "dinner" for dessert. One year, I served my children "cupcakes" that were actually meatloaf with mashed potato "frosting." Then we followed that up with a dessert of "grilled cheese sandwiches" which were actually slices of pound cake with orange-tinted frosting as the pretend cheese. I originally got the recipes from Family Fun.


Meatloaf Cupcakes 
(Makes 12 "cupcakes")


Ingredients:

  • 1 lb. ground beef
  • 1/2 c. seasoned bread crumbs
  • 1 c. grated Monterey Jack cheese
  • 3 T ketchup
  • 1 egg
  • 1/2 t. celery salt
  • 1/4 t. pepper

Potato frosting:

  • 3 c. mashed potatoes
  • food coloring
Instructions:
  • Preheat oven to 375 degrees and line muffin tin with foil cups
  • Mix together meat loaf ingredients until well combined and divide mixture among cups (the cups should be about 3/4 full)
  • Bake for about 15 minutes or until all cooked through
  • Divide mashed potatoes into different bowls and add food coloring to create different colors of "frosting." Spread a generous amount of mashed potatoes on each meatloaf cupcake.
  • If you want to add to the illusion you could also throw on a few sprinkles (you will hardly taste them but they did add to the effect).
These are actually so delicious and easy that we like eating them all year round--not just for April Fool's Day.


"Grilled Cheese" Pound Cake


Ingredients:

  • 1 Pound Cake
  • 1 c. buttercream or white frosting
  • food coloring
Instructions:
  • Cut the pound cake into thin slices and toast them in a toaster oven until they just start to brown.
  • Cool the slices of cake and create sandwiches with orange-tinted frosting in the center (use food coloring to tint your frosting)

*April Fish: Decorate fish and put them on each other's backs. This is an April Fool's tradition from countries such as Italy, France and Belgium. Children and adults traditionally tack paper fishes on each other's back as a trick and shout "April fish!" in their local languages. You can easily search for coloring pages of fish online to use as a starting point such as I did for my toddler last year.


Or, older children can design their own fish from scratch. I love of all the varieties of fish that kids designed here.

*Silly Hat Parade: When April Fool's was near Easter one year (as it will be again this year), We had a silly Easter Parade. We danced around to the song "Easter Parade" but instead of fancy Easter bonnets, we wore all sorts of silly hats.


*Moving Dinner: My friend actually does this for Valentine's Day with her kids, but I think it is perfect for a silly and fun April Fool's Day dinner. Each person chooses one food and one game/activity--whatever they want! They each get to choose one different room to do their activity in (i.e., living room, bath room, bedroom, patio, whatever). You move from room to room in the house and eat that person's food and play that game in their chosen room--some of our minute to win it games would be great ideas for games. You could also just do something as simple as dancing to Ring Around the Rosy, playing a quick game of pictionary, or having horsey rides from Daddy--whatever the child in charge decides!

*Silly Books: Read some silly books such as the following:
  • April Foolishness  by Teresa Bateman and Nadine Bernard Westcott--This is a charming story about kids trying to fool their grandpa on April Fool's Day.
  • Previously by Allan Ahlberg and Bruce Ingman--This book tells classic fairy tales--in reverse. April Fool's Day is all about being silly and backwards, so this backwards book is a perfect fit.
  • Silly Sally by Audrey Wood--Another silly book that is perfect for toddlers--Silly Sally always walks on her hands instead of her feet.. While going to town, she meets and plays with different animals.
*Foolish Dinner: Have a Silly April Fool's Dinner as Andrea shared with us last year! The kids had a "menu" to order from--but they never quite knew what they were getting.

*April Fool's History: If you want to sneak in a little learning on this holiday, you can also read about the history of April Fool's Day with your kids here.  You could type of some of these fun facts on little notes to put in your child's lunch or snack just as Teach Mama did here with St. Patrick's Day lunchbox notes.

For more April Fool jokes and pranks, see all of our April Fool's activities here and check out my April Fool's Day Pinterest Board.

-->

3.18.2013

DIY Puppet Theater and Stage

A couple of years ago, I made this puppet theater as a Christmas gift for my kids.

 This also doubles as a "stage" for my kids to put on shows. I created the curtains to be long enough that they could be lifted up and used as full-size curtains.


I created this to fit an opening we have between our dining room and family room. If you don't have a large space as I did, you could easily do a doorway-sized puppet theater like this. I liked having a larger theater for my three kids to all be able to use together and to use as a "stage" as well as puppet theater. However, it is more difficult to store because it is so big. Still, it is very worth storing because all three of my kids love it!

Below are the instructions for creating it. I am not an expert sewer but I was happy with how it turned out. If you have any questions just comment below and I'll do my best to help you out.

Supplies:
  • two tension curtain rods (these come in various sizes--get the appropriate size depending on whether you are creating this to fit a door/hallway or if you have a larger space as I had).
  • light blue felt for background (bought from a bolt in the felt by the yard section)--I got two yards to fill my large space--the felt I bought was very wide.
  • small pieces of yellow and white felt (can also be purchased by the yard or as individual felt sheets)
  • red fabric for curtains (one yard would fit a small door/hallway. I used four yards because I was filling a larger space and creating curtains that could both be put down for a puppet theater and be lifted up to be used as regular stage).
  • thread
  • sewing machine
  • sewing scissors
  • decorative cord (optional). I got two yards. For a doorway theater, one yard would be enough.
  • hot glue gun with glue (optional--if you are going to glue instead of sew on some elements)
  • fusible web (optional)
  • gold fabric (optional)
  • iron (optional--if you are using fusible web)
Note: The amount of fabric and the size of the tension rods will depend on how much space you have. For a doorway theater that fits a regular hallway, you will use less than I did. I had a larger opening between our dining room and family room that I measured my fabric and tension rods to fit.

Instructions:

Curtains:

First, I created two basic curtains. I used the tutorial here as a basis for creating the curtain. Here is my explanation of how to create the curtains:
  • Measure and cut your fabric to fit your space. I used two curtains for my theater because I was using it both as a puppet theater and as a "stage." You could also just have one curtain if you are only using it as a puppet theater.
  • Hem the bottom of your curtain.
  • To create the loop on the top of your curtain, first turn over the top 1/4 inch and then fold it over again a couple of inches--leaving a space wide enough to fit your curtain rod. Pin it in place.
  • Sew a straight line across your fold, making sure the loop you are creating is big enough to fit your curtain rod.
  • Repeat if you are creating two curtains as I did.
  • You can add decorative lettering with gold fabric as I did by using fusible web to iron letters on the curtains. Here is a tutorial explaining fusible web if you are unfamiliar with it.
  • I also added decorative cord to the curtains. I just used hot glue to attach the cord.

Background:

If you want to add a background as I did, you can make it as follows:
  • Measure your fabric and cut the fabric to the appropriate size for your space. One yard of fabric would fit a small doorway. My space was larger so it was a couple of yards. I used blue felt for the "sky." Felt holds up well and does not need to be hemmed.
  • Add decorative elements as desired. I put on a yellow felt sun and white felt clouds. You could hot glue these on or sew them on to make them more secure. Other elements you might add could be mountains, trees, etc. You could also create a night scene with black felt and white stars and moon.
  • Fold over the top couple inches of your background and sew a straight line across to create a loop that you can fit a curtain rod through.
When you are done with the curtains and background, assemble the puppet theater by sliding the curtains and background on your curtain rods. Then, mount the curtain rods in your space and have fun putting on shows!
-->

3.17.2013

April Fool's Day Party and Tricks for Kids

My oldest threw a simple April Fool's Party for her friends a couple years ago and they had a blast! She made her friends "report cards" with failing grades and then had an invitation on them.  She also asked everyone to bring a prank along to share with everyone.  The pranks were really fun and innocent.

They played silly games for the silly holiday:
  • Simon Says (opposite style) - you only get out if you do the action WHEN Simon Says.  Kind of a tricky one!
  • Twister
  • Charades


  •  They each shared their own April Fool's Jokes. Some fun and innocent ones that my friend's daughter shared are:

    • Set back all clocks 1 hour
    • Make tap water colored
    • Place Saran wrap in inconvenient places (seats, doors, toilets, etc.)

    • Make fake nail polish spill
    • Swap cereal bags in boxes
    • Put on makeup or mustaches on sleeping victims
    • Replace deodorant with cream cheese
    • Rubber ducks in the toilet
    • Replace soap with syrup
    • Trap toothbrushes in frozen water in toothbrush cup
    • Place Bricks in backpacks
    • Decorate car to say “just married”
  •  
    Refreshments were dirt cups (chocolate pudding, crumbled oreos to represent dirt and gummy worms) and "lemonade" (yellow jello with a straw placed in it before setting).  She really tricked her friends with the lemonade!

    See our other April Fool's Day Ideas
    including our
    Silly April Fool's Dinner! 

    -->

    3.14.2013

    Limeade Ice Cream Pie Recipe in honor of Pi Day and St. Patrick's Day!

    Today is 3.14--Pi Day! In honor of this day, we like to eat pie. Here's a fast and easy ice cream pie that we will be eating today. My mom taught me how to make this when I was just a girl, and it is still a favorite of mine because I can mix it up quickly and it tastes delicious.


    Ingredients:
    • One 1.5 quart carton vanilla ice cream
    • One 15 oz can frozen limeade concentrate
    • Green food coloring (optional)
    • Lime (optional)
    • One large graham cracker crust
    Instructions:
    • Stir together ice cream and limeade concentrate. Depending on the size of your crust, you may not use all of the ice cream. You might have to soften the ice cream to make it easier to blend.
    • Add green food coloring if desired (without the food coloring, the pie will just take on the white color of the ice cream).
    • Add juice of a lime or lime zest if desired (I sometimes put in juice from a half of a lime--you could put up to a whole lime in if you like your pie tart, or you could leave out the fresh lime juice and it will still taste good).
    • Pour mixture in pie shell and freeze for five hours or overnight.
    This is also a fun treat to make around this time of year as it is green for St. Patrick's Day. And if you were in the mood for another fast and easy pie, check out this chocolate oreo pie that is equally simple.

    Return to Recipes

    -->

    3.13.2013

    Marguerites: Peanut Butter Marshmallow Crackers Recipe

    These little gems go a ways back in our family.  My grandma, who is now 90 made these for her 4 little kids growing up.  Then of course, the tradition passed on to my mom, myself and now my kids.  It is a yummy after school snack. 

    The original recipe called for a large marshmallow and my grandma toasted the crackers in the oven.  As time and inventions have occurred, we have adapted to microwaves and mini marshmallows.  But they are still just as yummy!

    Ingredients:
    Soda Crackers
    Peanut Butter
    Mini Marshmallows

    Directions:
    Spread peanut butter on soda crackers.  Place 4-5 mini marshmallows on top of the peanut butter.  You can make 10-15 at a time on a plate.  With 10-15 crackers, place them on a microwave-safe plate in the microwave for 30 seconds.  *Note that if you make less, you will need to adjust the time accordingly.  5 crackers will probably take about 15 seconds.

    My kids favorite part is watching the marshmallows expand when they come out.  And of course eating them.

    Thanks grandma for a fun after school tradition!

    Return to Recipes
    -->

    3.12.2013

    Tips for Dyeing Easter Eggs

    We look forward to dyeing our own Easter eggs each year. Here are some tips for fun with egg dyeing!


    Recipes

    Sometimes I need to look up the simplest things online such as how to hard boil eggs, so if there are any others out there like me, here's how to hard boil eggs and make egg dye:

    HARD BOILED EGGS
    Ingredients:

    eggs
    cold water
    1/2 t. salt
    1 T vinegar (optional)

    Instructions:
    1. Put the eggs in a single layer in a saucepan and cover with at least an inch or two of COLD water (Starting with cold water helps keep the eggs from cracking). Adding a a half teaspoon of salt can prevent cracking and make eggs easier to peel and a tablespoon of vinegar will prevent egg whites from running out of eggs that might crack--but it might also affect the taste if you plan on eating your eggs after you dye them.

    2. Bring the eggs to a boil. As soon as water starts to boil, reduce the heat to low on the burner. Let simmer for one minute

    3. After one minute, remove pan from heat, cover, and let sit for 10-12 minutes. You can check for doneness by sacrificing one egg and cutting it open. If it isn't done, cook the other eggs a minute or two longer. Depending on your pan and the number of eggs, the cooking time can vary by a couple of minutes.

    4. Remove eggs with a slotted spoon and put in a bowl of ice water. Once cooled, strain water from eggs.

    EASTER EGG DYE


    Ingredients (per color):
    1/2 c. hot water
    1 t. vinegar
    abt. 10 drops food coloring

    Instructions:
    Boil water and combine 1/2 c. boiling water, 1 t. vinegar and about 10 drops food coloring for each batch of dye.

    Tips for Dyeing Eggs

    We sometimes pour our dye in different colored cups, but last year, we used an extra large muffin pan for our egg dye and it worked great. We did our egg dyeing outside so I didn't have to worry about staining the carpet. My kids loved dipping the eggs and making their own creations.

    For some variations on traditional egg dyeing, you could try some of the following:
    • Use a white crayon to draw designs on some eggs before dyeing. Then dye the eggs as normal. When you dye the eggs the wax on the crayon will prevent the dye from sticking to those parts on so will create a fun effect.
    • You could also create a similar resistance design by putting masking tape or small stickers on the eggs before dyeing. Then carefully peel off stickers or masking tape when dye is dry and the parts that were covered with stickers will be white.
    • Create a tye dye effect by mixing 1 T olive oil with dye and gently rolling the egg in the mixture. Let it dry on a paper towel. Once dry, you can roll it in another color if desired.
    • Cover your egg with rubber bands in a striped or criss-cross pattern. Then dye eggs. Take off the rubber bands after dyeing eggs and you will have a striped egg!
    • For glittery eggs, first dye the eggs and let them dry. Then, use a paintbrush to apply glue to the egg and sprinkle glitter on top of the glue.
    • Consider hard boiling brown eggs instead of white eggs. When you dye them you will have a richer, more earthy set set of colored eggs.
    Have fun dyeing eggs and celebrating this holiday...And see all of our Easter ideas here!
    -->

    3.11.2013

    Construction Themed Birthday Party

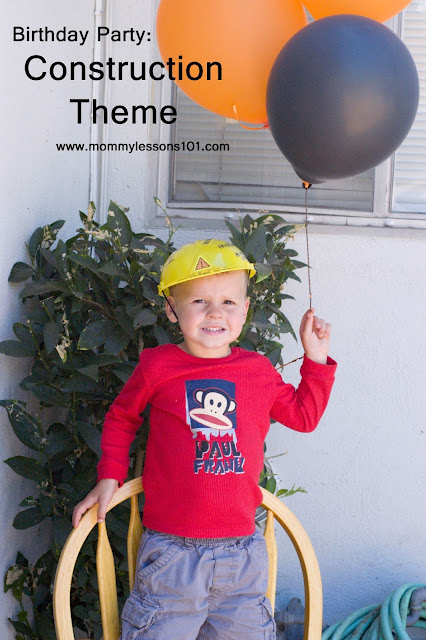
    My middle son loves building and construction, so we had a construction-themed birthday party for his third birthday. Here is what we did for the party:

    Decorations
    We bought yellow caution tape from the local hardware store and strung along the walkway to our house, around the door, and on the food tables. We then had orange, black, and yellow balloons and orange table cloths to complete the decor.

    Food
    We served pizza and orange food--carrot sticks, orange chips, and orange soda--because not only is orange a "construction" color, it also is my son's favorite color.

    Activities

    Because my son was only three, we kept the "structured" activities to a minimum. The families were mostly just playing and visiting... but here are a few things we did:
    • When the guests arrived, I had each person use a permanent marker to sign a construction worker helmet for my son.

    • I also had drawn an outline of my son on brown paper and created a paper version of him on the wall.  On the paper version of him I also wrote some fun facts about some of his favorite things. I then set up a long piece of brown paper next to the paper figure along with a measuring tape and had each person measure how tall he or she was in comparison to the birthday boy.

    • We opened up our sandbox and brought out all my son's construction-themed toys. This was the favorite activity for all the kids.
    • We had a toolbox relay. I bought cheap pretend tools and containers from our local dollar store. I then set up two sets of tools on one side of our lawn and empty toolboxes on the other side of the lawn. I divided the kids into two groups and had them line up. The first person in each line raced across the lawn, chose a tool, and raced back to put it in the toolbox. Then the next person went, and so on until everyone on the team had gone. The first team to fill up their toolbox with all of the tools were the winners.
    • We had a classic wheelbarrow race across our lawn. We did this in several "heats" since we didn't have enough space for everyone to race at once.


    Cake
    For the cake, I simply frosted a cake with orange frosting and used a toy dump truck with crushed oreo "dirt" to decorate.


    -->

    3.10.2013

    DIY Post-it-Note Craft: Breaking a Habit or Setting a Goal in 21 Days

    Parents out there! I have one piece of advice for you that needs to become a priority.  Fill your own buckets too.  We are so busy taking care of our kids every needs and it's noble and I'd be lying if I didn't say that I love it.  BUT, in order for us to be the very best mom we can to these kids, we need to make sure we are filling our own buckets and not letting them run dry.  One of my favorite things to fill my bucket is to run, especially outside.  I find that when I run, I am able to think everything out and release any pent up stress.  I notice when I am not running, I am not as efficient and not as good as a mom as when I do run.  Funny, I know.  But it's true.

    So with winter and a big move, I found myself letting that bucket run dry.  In order to get back on the horse, I tried out this little {simple, cheap and EASY} tracking system to get back into the swing of things and re-instate my habit.

    It is generally said that it takes 21 days to break a habit, and perhaps to form a habit.  So, here's a fun idea to keep track of your 21 days.

    I went to the Dollar Store and found these post-it-notes.  Then I labeled all of the post-it-notes from 1-21 and stuck them on a door frame.  Each time I ran, I took a post-it-note down and eventually it was no longer something that needed a reminder.

    So find something to fill your own bucket - be it reading a book, exercising, scrapbooking, a girls-night-out, quilting, cooking, attending the theater, etc.  And get back into the habit of doing it.  Because I promise, you will end up being a better mom because of it!

    **I also love that kids could do this with piano practicing, brushing teeth, exercise, healthy after-school snacks, homework, etc.  Try it out together with your own goals!

    Ideas for setting a goal:
    1. Write it down.  Seeing things visually really stimulates our mind.  Plus it so rewarding to cross something off when it's done!
    2. Provide yourself with memory tricks - for example, tell your kids that every time they tie their shoes, to ask if they did their habit for the day.  Or every time you look at your watch to ask yourself.  Another trick I've heard is to put a penny in your shoe.  Every time you feel it, ask yourself how you are doing?
    3. Be positive and find find friends and family who can help you be positive as well. 
    4. Reward yourself.  It can be verbally, or even with a fun new item.
    5. Take one step at a time and don't give up if you miss a day, just keep pulling those post-it-notes down one by one!  


    -->