Showing posts with label birthday. Show all posts

4.01.2015

Beauty and the Beast Birthday Party

My daughter turned four on New Year's Day while we were visiting family for the holidays and so we decided to throw her a birthday party with her cousins. She loves princesses, and her favorite is Belle. She asked for a  Belle Princess Dress from Santa for Christmas, and she was thrilled to wear her new dress and celebrate with family on her special day. Here is a glimpse at her birthday party...


Invitations, Party Favors, and Thank You Notes

We sent out a simple evite to family members to invite them to the party. I have seen many cute "Be our Guest" invitations as well. We used the "Be our Guest" theme for the party favors. We found favors at the party store and 99 cent store and made two sets of favors--favors for boys and favors for girls. The favors for the boys had a picture of The Beast, and the favors for the girls had a picture of Belle. They all said "Thank you for being my guest!" The most popular things in the party favor bags were ring pops. We also gave out pencils, mini notebooks, princess jewelry (girls), and monster finger puppets (boys).

After the party, we sent out Thank You's with a picture of my daughter at the party and the saying "Thank you for Being my Guest."

Decorations

We continued the "Be our Guest" theme for the decorations. I printed a simple picture of Lumiere and added the text "Be our Guest" and framed the picture to use as a centerpiece. A yellow tablecloth and princess paper goods completed the simple set up.


The Cake and Cupcakes

I bought this Belle Doll as a gift for my daughter and also used her as the center of a doll cake. I made the cake by layering a bundt cake, another cake baked in a small round Pyrex bowl, and an over-sized cupcake. I removed the doll's skirt and wrapped her legs in plastic wrap and then inserted her in the center of the layered cakes. I then frosted with yellow frosting to make the cake look like a dress. You could also buy a doll dress pan if you want to simplify (Wilton Wonder Mold Kit ). But I found the layering worked just fine for my purposes.

I used extra cake batter to make cupcakes and I baked the cupcakes in these cute flower liners (Wilton Yellow Petal Baking Cups, 24 Count ).

Activities

When the guests arrived, we had a craft area set up for kids to bead necklaces and decorate crowns. I bought large foam beads here for the necklaces (Foam Beads 2-Lace Kit ). I picked up the cardboard crowns and stickers at the 99 cent store and party store.


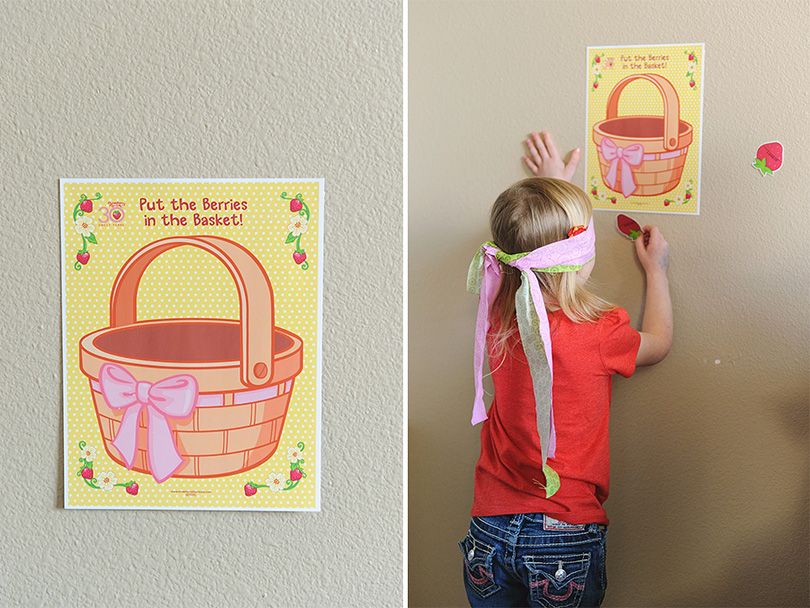
We also played "pin the rose" on Belle--this was just like the classic "pin the tail on the donkey" game. I used this illustration as a model to draw a picture of Belle on a poster. I left the rose off of the stem and and printed out pictures of roses for the children to try to match up to the stem Belle was holding.

One final game we played was a cake-walk style game. I printed out large pictures of roses to create a "rose garden" and I numbered the roses. I then played music from Beauty and the Beast as the children danced around. I periodically stopped the music and called out a number (I used dice to decide the number, you could also create number cards to draw the number). Whoever was standing on the chosen number received a small prize. For prizes, I just used leftover items I had from putting together the party favor bags. No one felt sad in the end because after the final turn we handed out the party favors to everyone.

We also served lunch as part of the party--a simple lunch of my daughter's favorites (probably most other preschoolers' favorite foods, too)--pasta, grapes, carrot sticks, rolls, and lemonade.

It was a delightful party. My daughter was so adorable and excited. Best of all, we loved being with so many family members. We live away from most of the family, so it was a special treat to be able to celebrate with cousins!


3.16.2015

Dinosaur Birthday Party

Recently my oldest son turned seven years old. He is passionate about dinosaurs and was so excited to have a "dinosaur expedition" in celebration of his seventh birthday. Below is a look at some of what we did to make this a fun day for him and a few of his friends.


Invitations, Decorations, and Favors

The invitations had a picture of my son in his paleontologist costume along with the phrase "Come join us for a Dinosaur Expedition" I used a watermark of dinosaur bones behind where I wrote the party details. We didn't decorate much--We just had a few balloons and a green tablecloth sprinkled with dinosaur confetti from Party City. The rest of the "decor" consisted of  dinosaur toys my son already had as well as the set-up of various activities (see below). I bought party favors from Party City and Amazon and we didn't pass them out all out once--kids had to collect their party favors by going to different stations on an "expedition."

Activities

The party was set up as a dinosaur expedition, so when guests arrived they received an empty party favor bag and a checklist of activities that read as follows:

Welcome Paleontologists!
Are you ready for a dinosaur expedition? Grab a dinosaur pencil and a brown bag to collect treasures in. Write your name on the bag--the pencil is yours to keep. Pick a dinosaur tattoo as your first prize for starting the expedition. Then follow the checklist on the bag to find more dinosaur treasures and fun.

•             Dig for a dinosaur in the sand
•             Excavate a dinosaur from ice
•             Fly like a Pterosaur in bounce house
•             Build a Lego dinosaur
•             Help some volcanoes explode
•             Help hatch baby dinosaurs
•             Don’t get burnt by the lava rock

The first activity was a dinosaur dig in our backyard sandbox. We simply buried some toy  Dinosaur Fossil Skeletons in the sand box and provided paintbrushes for the kids to brush away sand and look for a toy skeleton to keep.


Next, the kids excavated dinosaurs from ice. There are several versions of this activity that I found on Pinterest. I kept it simple and just froze some of these toy Mini Dinosaurs in water that I poured in large muffin tins. The muffin tins were a fast and easy way to freeze them though if you have more time, freezing them in water balloons can make them look more like they are in eggs. We provided small hammers and screw drivers to the kids and let them have fun chipping away at the ice. When they finally were able to extract toy dinosaurs, they could keep what they had excavated. Fortunately we live in southern California, so we could to this on our back patio. The 7-year-old boys were thrilled to be able to use hammers and fortunately no one got injured :) Definitely supervise this activity though!


Meanwhile, I had a Lego building station built inside where kids could try to build unique Lego Dinosaurs. Here are just a few of my son's favorite Lego dinosaurs he has built.

We also had a bounce house where the kids could pretend to fly like pterosaurs, and we served classic, easy party food--pizza, strawberries ("volcanoes"), salad, etc.

After lunch, we made our own "volcanoes" explode. First, we did classic baking soda and vinegar volcanoes. We built the volcano shapes with homemade playdough pressed around small water bottles. We let every child have a chance to "explode" a baking soda/vinegar volcano. And then for the grand finale, we did our favorite mentos/diet coke geysers (previously featured here and here in this blog).


Our last two activities came from this awesome dinosaur party. We did a "nesting ground relay" in which the kids had to race to "hatch" baby dinosaurs from balloon "eggs" (we used the same dinosaurs--Mini Dinosaurs (72 count)--we had used in the ice excavation for this activity. And we played the classic "hot potato" game but called it "hot lava rock" instead. To make it a little extra exciting, I heated up a red corn bag so our "lava rock" truly was hot. Prizes for the relay and the hot lava rock game were a mixture of candy, toy dinosaurs (leftover from the other activities), pencils, and dinosaur tattoos (Cool Dinosaur Tattoos )


 We finished the party with a volcano cake. I created the volcano with a round cake topped with a bundt cake. I frosted it with chocolate frosting, added a little red "lava" frosting and  green frosting for "plants" at the base, and then let my son decorate the rest himself with some miniature toy dinosaurs.


It was definitely an exciting party, with lots of laughter and fun for our seven-year-old and his friends. For more birthday party ideas check out our complete birthday party page here. Also, take a look at our "D is for Dinosaur" Preschool themes here and here!

8.01.2014

Strawberry Shortcake Birthday Party

This year my little girl requested a "Strawberry Shortcake" birthday party. It was a lot of fun coming up with cute ways to decorate and celebrate at her party. The decorations were simple ~ lots of pink and green and strawberries! We served cupcakes and strawberry lemonade.

 photo strawberry1_zps4c2bdb34.jpg
 photo March2013_0169_zps6fc5a3d3.jpg
 photo March2013_0189_zpsfdd03741.jpg
 photo March2013_0194_zpsb35e1a23.jpg

I found this shirt at Old Navy with vintage Strawberry Shortcake, which I thought was so perfect:

 photo strawberry2_zpsbb86e22b.jpg

For activities we played Bingo, colored pictures, pinned berries in a basket, had a beanbag toss, played a little freeze dance, read a Strawberry Shortcake book, and had a strawberry-shaped piñata.

 photo March2013_0387_zps5bbbce61.jpg
 photo strawberry3_zpsfb84a115.jpg
 photo strawberry5_zps558e01db.jpg
 photo strawberry6_zps0dbbf545.jpg

I loved the cupcakes, which I put inside little terra cotta pots. I sprinkled them with oreo cookie crumbs to resemble dirt and topped them with a chocolate-covered strawberry:

 photo March2013_0198_zps77854c04.jpg

The party favors were made by my sweet mom. I kept it super simple. Besides the candy from the piñata, everyone took home a strawberry-shaped beanbag:

 photo March2013_0315_zpse9b1f810.jpg

I think it's safe to say this little girl had a blast. She had a big smile all day long!

 photo strawberry7_zps5c34196b.jpg


 photo strawberry8_zpsde223c7d.jpg

Andrea also did a Strawberry Shortcake Party and here is her fun cake she made for her daughter:

{The polkadots and strawberries are from fruit roll-ups, the stripes are Sour Straws, the balls are Mint Chocolate Balls and the rest is frosting!}


7.14.2014

Cloudy with a Chance of Meatballs or Science-themed Birthday Party


My second child recently turned five, and he loves Cloudy With a Chance of Meatballs --both the book and the movie. So for his birthday, we based his party off of themes from both the picture book and the movie.


Invitations

I took a picture of my son in a labcoat and then pasted that picture over an image of the cheeseburger scene from the movie to make my child look like he was Flint Lockwood watching cheeseburgers fall from the sky. I glued these pictures onto a piece of cardstock and wrote the party details on the reverse. This could also easily be done in Photoshop if you had that capability (my computer is too slow to run Photoshop right now and so I just cut and pasted the old-fashioned way).


Décor

*We kept our decorations simple--colorful plastic tablecloths and brown and red "meatball" balloons. Then we set up stations for the kids to play in when they first arrived. We blew up our bounce house and taped a sign and picture of the Jell-O scene from the movie on the outside of the bounce house. The kids pretended that they were bouncing in orange Jell-O.

*Our second station was Flint Lockwood's laboratory. I set up a bucket of water, colored with food coloring, along with a beaker, flask, and test tubes from this set. The kids loved pouring, transferring, and pretending to be scientists. My son also loves to take things apart, so we bought him some old electronics from Goodwill for his birthday. He had started to take them apart prior to the party, and he set up a station at the party to continue working on and playing with these (for safety we set this up at a table away from where little babies were playing).


Food

Because the book starts out with Grandpa cooking pancakes, we scheduled our party in the morning and served a pancake breakfast. We used our favorite recipe for pancakes here. We served bacon, orange juice, and, as a nod to the second movie, we had a Watermelophant serving bowl (with watermelon balls inside) made by my father-in-law. We also added strawberries and whipped cream.

Watermelophant Serving Bowl Instructions: 
1. Trace around a small round plate on top of watermelon. Cut around outline--Save top circle.
2. Scoop out watermelon with melon baller. Set aside to put back into the watermelon later.
3. Carve out a mouth shape and use the melon baller to scoop out holes for the eyes.
3. Cut top of watermelon that you removed into the shape of a trunk and attach to watermelon with toothpicks.
4. Add ears (bok choy) and tail (green chili pepper) and eyes (grapes) with toothpicks to attach.
5. Place melon balls back in watermelon for serving.

Science Demonstrations

After breakfast, we invited all of the children to come to Flint's laboratory and do a few science demonstrations. We choose four simple demonstrations:
1.Making Tissue Paper Jump with Static Electricity and a Balloon
--You can see my demo here in which we used styrofoam--it works even better with a balloon and tissue paper--just remember to "charge" the balloon by rubbing it in your hair.
2. Magic Milk Colors
--See the demonstration in our St. Patrick's Day lesson here.
3. Inflating a Balloon with Vinegar and Baking Soda
4. Mentos & Diet Coke Geysers(Geyser Tube with Caps)
You can see instructions for the last two demonstrations in my States of Matter lesson plan here. One tip I learned for inflating the balloon with vinegar and baking soda is to stretch out the balloon by blowing it up and let the air out before filling it with baking soda. We used a tool we bought online to help us launch the diet coke geysers extra high!

*Piñata

Next we we decided to have it "rain" food from our FLDSMDFR Piñata. We made this homemade piñata based Flint's invention in the movie. This was a project that the kids loved helping with. Their dad taped a brown paper box into the right shape, and they helped cut fringes on white tissue paper. We layered these tissue paper fringes on the box and added construction paper decorations to make it look just like the machine from the movie.

We added a wire loop and rope to hang it from a tree and had a blast hitting the piñata at the party. Even though we tried to weaken the cardboard when assembling it, it was so sturdy that we did eventually have to "input" some numbers in the machine and cut open the bottom of the box to let the candy out. The kids loved it though!

Dessert

For dessert, we served meatball cake pops and a cheeseburger cake. The meatball cake pops were delicious but labor intensive. Thanks to my kind mother-in-law for doing these--since they had several layers of frosting that had to dry between coats to get the right effect. For those brave enough to try--here is the video tutorial she used to make them.
The cheeseburger cake wasn't as difficult. The top and bottom are regular round cakes with a round brownie "meat patty" in the center. Different colored frosting made the "cheese" and "ketchup." And I smashed up gummy fruit wedge candy to become "lettuce" and "tomatoes."

Party Favors

In addition to treats from the piñata, we sent the kids home with simple party favors from the dollar store--ice cream bubbles, stickers, a suction ball, and a food-themed eraser. I glued a map from the book Pickles To Pittsburgh (sequel to Cloudy With a Chance of Meatballs ) on a brown paper bag and added colorful tissue paper around the goodies.


2.02.2014

Treasure Chest Cake for Pirate or Princess Party

This month, we celebrated the birthdays of two of my children--my son turned 6 and my daughter turned 3. We decided to just have one birthday party for them and so we invited a couple of families over who had children both of our kids' ages and we had a party that combined elements of the princess and pirate birthday parties my sister previously shared.

After "dancing at the ball" like princesses, having "cannon ball fights" with black balloons, and more, the pirates "stormed the castle" (a castle pinata), and then we finished off with this treasure chest cake--which worked perfectly for both themes in our pirate and princess party! The cake was inspired by this one I found online, and more detailed instructions for a treasure chest cake can be found here.


I used different candies than those in the tutorial linked above to decorate my cake. We used red vines for the straps on the treasure chest, and we used milk chocolate balls cut in half to line the sides of the straps. I also used a Reeses peanut butter cup and a kit kat bar that was trimmed down to create the lock. "Treasure" inside the chest consisted of chocolate gold coins, milk chocolate balls, and Rolos. The "sand" underneath the treasure chest was made of brown sugar.

Be sure to check out our complete Princess Party and Pirate Party posts that we shared previously for more ways to celebrate!


11.30.2013

Christmas Train Birthday Party + Cake


Remember our ever popular Thomas the Train Birthday Cake?  Well last year, my son who's birthday is in December wanted a train party, so we decided to change it up to a Christmas train.  We took the family on a Christmas train ride and finished the evening with pizza and this cake.  Santa and the elves all sang Happy Birthday him and we enjoyed a very popular train ride.  If you live in Utah or visit Utah for the ski slopes, you should check out Heber Valley Railroad.  So fun, even if it's not Christmas time!  I have found a lot of joy in having simple family parties when my kids are 1-3 years old.  Another fun toddler party we did was a Zoo Party along this same lines.  However, if you want to spruce it up with some games and activites, check out our Thomas the Train Birthday Party with lots of ideas that could be used for this party as well!


1.  Bake cake in 2 loaf pans.
2.  Cut each loaf in half and cool cakes in freezer to make them easy to frost
3.  Frost each cake and place it on the tray where you would like it to be.  I put the front of the train vertical to give it the height of the engine.  The rest of the loaf halves laid flat.
4.  Place Chips Ahoy cookies on each train for the wheels
5.  Use various candy for the train's cargo.  We used Pull n' Peel licorice, M&Ms, both wrapped and unwrapped Rolos and Candy Canes.
6.  Stick candles in and there you have it!

Return to Birthday Party Ideas
or our
Christmas Ideas