Showing posts with label DIY. Show all posts

12.27.2013

Homemade Cardboard Boxes and Blanket Forts, a Perfect Snowy or Rainy Day Activity


 Kids are home for Winter, Spring or Summer Break and you are trying to figure out how to keep their minds engaged rather than video games and movies the whole time?  It's easier in the Spring or Summer as the outdoor activities are endless.  But Winter can be a little trickier.  Here are a few ideas for you.

#1: Pull out a cardboard box, scissors, paint, etc.  Let your kid's imaginations go wild.  My son came up with a "monster" box and used it as a costume.  Kids can make a play house, or a toy kitchen, a decorative table for a tea party, etc.  For fabulous ideas on things to build, read one of my favorite books growing up, Christina Katerina and the Box!


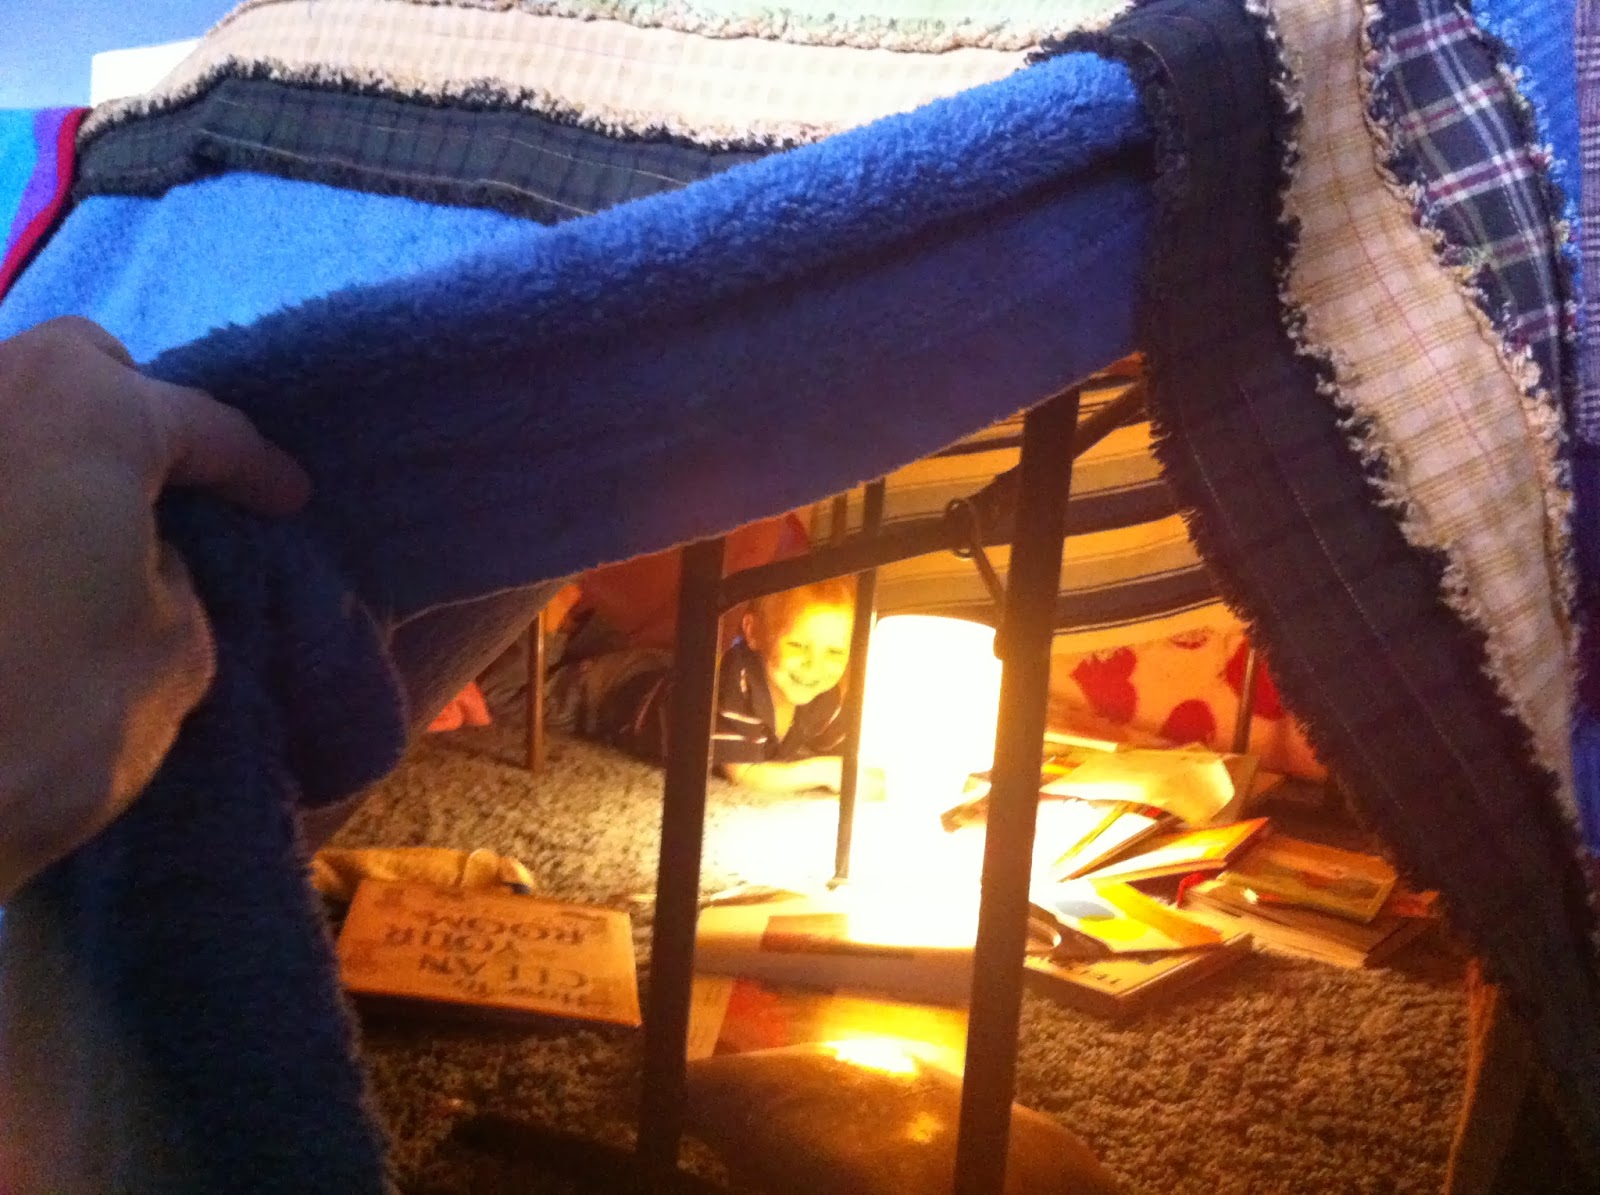
#2: Blanket Forts.  We set up cardboard tables and pull out blankets.  The kids then build their own forts.  {The books on top are just to hold the blankets in place}.  The kids can fill the fort with activities or books.  Perfect for a fun afternoon read-a-thon!


6.21.2013

Ikea Hack: Chalk Table

The little table and chairs that I picked up at Ikea for $20 was in a sad state of disrepair after a couple of years. The top of the table was made of a material that was little more than cardboard, so it didn't hold up to the rough play of my three kids. However, rather than throwing out the table, we decided to take some scrap plywood from our garage and create a new table-top--this time with a chalkboard finish. Our chalkboard paint was leftover my last chalkboard project and we already had the wood in our garage, so the project was "free" for us--though I'm sure it wouldn't cost much if you were to buy the materials.


To make this table, we first cut a piece of plywood slightly larger than the original table frame. That way the table that could barely fit two chairs can now easily fit four or even six small chairs around the sides.

We cut off the corners so we didn't have any sharp edges to worry about with the kids.

Next, I sanded down the plywood and painted three layers of chalkboard paint onto the plywood, sanding between each layer and following the directions on the back of the paint can.

When the paint was dry, we screwed in the table from below. My husband measured and drilled holes and then screwed in the screws so that they held the plywood on securely without going through the top.


We then cured our chalkboard and then let the kids begin to play with it!


We soon realized that chalk dust can make a big mess, so if we were do to this again, we would definitely add trim around the edge to keep chalk dust from getting all over the ground. But as for now, we have kept it and just moved the chalk table to our kitchen where we can easily wipe up the chalk dust after kids are done playing. We also will throw a table cloth on this and use this as a kids' table for eating.


-->

4.20.2013

D.I.Y Fabric Corn Bags


Have you seen corn bags before? If not, you are missing out.  If so, you will understand why my kids love them so much!  Last weekend, my mom and I made about 15 of these.  We raided her cottons and flannels for fun fabrics and had a great time.  They remind me of Hot Water Bottles that I grew up with.  Do you remember those?  I would fill a rubber bottle with boiling hot water and use it for the same purpose.  Although corn bags can be used to simply warm you up, which is a primary use in our house, they have also been used for earaches, cramps, back problems, muscle spasms, neck kinks, headaches, running pains, etc. You warm them up in the microwave for 1-2 minutes and it can retain heat for 1-2 hour!

So here is how we made them.
Supplies needed:
Fabric (we cut two rectangles about 8" x 10" - this is very flexible based on what size you want).  You can use cotton or flannel.
Cardboard template to cut rectangles from
Thread
Feed Corn
We used feed corn and got it at our local IFA store.  It's not regular popcorn!  It will not pop when heated (normally!  Occassionally when first heating mine, I will hear one or two pops).

Instructions:
Using a rectangular piece of cardboard sized the way you prefer (mine was 8"x10"), place the cardboard on fabric and cut fabric to size.  Make sure the fabric is doubled so you get two rectangles.
Place right (brightly printed) sides of fabric together and sew around 3 sides of the fabric like you are making a pillow.  Then flip fabric right side out so you see the correct fabric on the outside.  

Fill pillow with feed corn.  About 2/3 full.  You don't want it bulging, but you want enough corn to heat up.

Sew the top opening closed and trim off all thread.

Voila!  You've got a cornbag.  It's as simple as making a pillow, but instead of stuffing, you put feed corn inside.  And it's much warmer.  Makes a fun Christmas, Mother's Day, Easter, Teacher Appreciation, Thank you, or Friend gift.


-->

4.06.2013

D.I.Y Grateful Jar

My favorite thing we have recently implemented with my children is a Grateful Jar.  This is simply made from a glass jar with vinyl white lettering that says "gather joy" or anything you want it to say for that matter.  You could even write the letters on with a white paint pen.

I then cut out hundreds of white pieces of paper and left them beside the jar with a pen.

I encourage the kids {and my husband and myself} to write down anything they catch someone doing in the house that they were grateful for and that brings joy.  It is so fun because everyone spends time trying to catch others in good acts.  And it helps everyone focus on the positives more and the joys in their lives. This has been so rewarding as a mom to see their self-esteems boost and the smiles on their faces when we pull them out each week to read what has gone well in the home.


I recently went to a parenting class where we all shared tips on how to make your kids feel loved and safe in their home.  I shared another one of my favorites where we sit down each night before bed and tell each other something we love about each person in the family.  We compliment each other.  I love this because it helps my kids focus on each others strengths and REALIZE that it's okay for others to have compliments said about them. It doesn't mean anything less of anyone else in the room.  If I could instill the ability for my kids to be happy for each other in their successes in life, I will have reached one of my biggest goals.

Some friend's suggestions from their homes were:
  • Use humor when things feel tense
  • Have huge family hugs every night
  • Ask your kids if there is anything the family needs to pray for {so they can openly share their struggles}
  • Have a family code that means "I Love You" so even if you are across the room from eachother, you can let them know.
-->

3.23.2013

Rainy Day Fun: Cardboard Box Puppet Theater


The other day it was pouring rain, so our plans to go out were cancelled. Instead my kids decided to make a little puppet theater out of a piece of cardboard. All we did was cut a hole in the center of one side of what was left of an old cardboard box. Then the kids decorated the cardboard frame to create a puppet theater. I set up the theater on a table and draped a blue sheet behind it as a backdrop. It was a little unstable (because we didn't have the back to the cardboard box), but I just taped it down to the table while we were playing with it, and that worked. Then the kids took turns putting on shows. It was a fun collaborative project that all three of my kids enjoyed creating and playing with. This puppet theater wasn't as elaborate as the fabric theater I made for my kids a couple of years ago, but it did have an advantage in that it was small and portable. It may not last forever, but it was certainly a fun project to keep us all busy and happy on a rainy day.  (Want more ideas of what to build out of a cardboard box?  A fun and creative read is Christina Katerina and the Box!)

Return to D.I.Y Crafts
-->

3.18.2013

DIY Puppet Theater and Stage

A couple of years ago, I made this puppet theater as a Christmas gift for my kids.

 This also doubles as a "stage" for my kids to put on shows. I created the curtains to be long enough that they could be lifted up and used as full-size curtains.


I created this to fit an opening we have between our dining room and family room. If you don't have a large space as I did, you could easily do a doorway-sized puppet theater like this. I liked having a larger theater for my three kids to all be able to use together and to use as a "stage" as well as puppet theater. However, it is more difficult to store because it is so big. Still, it is very worth storing because all three of my kids love it!

Below are the instructions for creating it. I am not an expert sewer but I was happy with how it turned out. If you have any questions just comment below and I'll do my best to help you out.

Supplies:
  • two tension curtain rods (these come in various sizes--get the appropriate size depending on whether you are creating this to fit a door/hallway or if you have a larger space as I had).
  • light blue felt for background (bought from a bolt in the felt by the yard section)--I got two yards to fill my large space--the felt I bought was very wide.
  • small pieces of yellow and white felt (can also be purchased by the yard or as individual felt sheets)
  • red fabric for curtains (one yard would fit a small door/hallway. I used four yards because I was filling a larger space and creating curtains that could both be put down for a puppet theater and be lifted up to be used as regular stage).
  • thread
  • sewing machine
  • sewing scissors
  • decorative cord (optional). I got two yards. For a doorway theater, one yard would be enough.
  • hot glue gun with glue (optional--if you are going to glue instead of sew on some elements)
  • fusible web (optional)
  • gold fabric (optional)
  • iron (optional--if you are using fusible web)
Note: The amount of fabric and the size of the tension rods will depend on how much space you have. For a doorway theater that fits a regular hallway, you will use less than I did. I had a larger opening between our dining room and family room that I measured my fabric and tension rods to fit.

Instructions:

Curtains:

First, I created two basic curtains. I used the tutorial here as a basis for creating the curtain. Here is my explanation of how to create the curtains:
  • Measure and cut your fabric to fit your space. I used two curtains for my theater because I was using it both as a puppet theater and as a "stage." You could also just have one curtain if you are only using it as a puppet theater.
  • Hem the bottom of your curtain.
  • To create the loop on the top of your curtain, first turn over the top 1/4 inch and then fold it over again a couple of inches--leaving a space wide enough to fit your curtain rod. Pin it in place.
  • Sew a straight line across your fold, making sure the loop you are creating is big enough to fit your curtain rod.
  • Repeat if you are creating two curtains as I did.
  • You can add decorative lettering with gold fabric as I did by using fusible web to iron letters on the curtains. Here is a tutorial explaining fusible web if you are unfamiliar with it.
  • I also added decorative cord to the curtains. I just used hot glue to attach the cord.

Background:

If you want to add a background as I did, you can make it as follows:
  • Measure your fabric and cut the fabric to the appropriate size for your space. One yard of fabric would fit a small doorway. My space was larger so it was a couple of yards. I used blue felt for the "sky." Felt holds up well and does not need to be hemmed.
  • Add decorative elements as desired. I put on a yellow felt sun and white felt clouds. You could hot glue these on or sew them on to make them more secure. Other elements you might add could be mountains, trees, etc. You could also create a night scene with black felt and white stars and moon.
  • Fold over the top couple inches of your background and sew a straight line across to create a loop that you can fit a curtain rod through.
When you are done with the curtains and background, assemble the puppet theater by sliding the curtains and background on your curtain rods. Then, mount the curtain rods in your space and have fun putting on shows!
-->

3.10.2013

DIY Post-it-Note Craft: Breaking a Habit or Setting a Goal in 21 Days

Parents out there! I have one piece of advice for you that needs to become a priority.  Fill your own buckets too.  We are so busy taking care of our kids every needs and it's noble and I'd be lying if I didn't say that I love it.  BUT, in order for us to be the very best mom we can to these kids, we need to make sure we are filling our own buckets and not letting them run dry.  One of my favorite things to fill my bucket is to run, especially outside.  I find that when I run, I am able to think everything out and release any pent up stress.  I notice when I am not running, I am not as efficient and not as good as a mom as when I do run.  Funny, I know.  But it's true.

So with winter and a big move, I found myself letting that bucket run dry.  In order to get back on the horse, I tried out this little {simple, cheap and EASY} tracking system to get back into the swing of things and re-instate my habit.

It is generally said that it takes 21 days to break a habit, and perhaps to form a habit.  So, here's a fun idea to keep track of your 21 days.

I went to the Dollar Store and found these post-it-notes.  Then I labeled all of the post-it-notes from 1-21 and stuck them on a door frame.  Each time I ran, I took a post-it-note down and eventually it was no longer something that needed a reminder.

So find something to fill your own bucket - be it reading a book, exercising, scrapbooking, a girls-night-out, quilting, cooking, attending the theater, etc.  And get back into the habit of doing it.  Because I promise, you will end up being a better mom because of it!

**I also love that kids could do this with piano practicing, brushing teeth, exercise, healthy after-school snacks, homework, etc.  Try it out together with your own goals!

Ideas for setting a goal:
1. Write it down.  Seeing things visually really stimulates our mind.  Plus it so rewarding to cross something off when it's done!
2. Provide yourself with memory tricks - for example, tell your kids that every time they tie their shoes, to ask if they did their habit for the day.  Or every time you look at your watch to ask yourself.  Another trick I've heard is to put a penny in your shoe.  Every time you feel it, ask yourself how you are doing?
3. Be positive and find find friends and family who can help you be positive as well. 
4. Reward yourself.  It can be verbally, or even with a fun new item.
5. Take one step at a time and don't give up if you miss a day, just keep pulling those post-it-notes down one by one!  


-->

2.07.2013

D.I.Y. Easy and Cute Meal Planning Menu

What a cute and simple idea this is to simplify your life.  All you need is a frame (you can get these at the Dollar Store or Walmart for very little money), scrapbook paper to match your kitchen or taste, and a dry-erase marker.

If you purchase 12x12 scrapbook paper, cut it down to the 8x10 size of the frame.  Place the paper inside the frame and use your dry erase marker to label Monday through Sunday.  Then each week, you can add what meals you are planning for the week.

Not only will this help with meal planning, it will help with grocery shopping and it's a very cute display for the kitchen.

Check out our recipes and get started!
-->

12.04.2012

On the Fourth Day of Christmas--DIY Santa Costume

Last year, my son really got into pretending to be Santa. All season long, he wanted me to pretend to be asleep while he delivered me toys. He asked me one day for a Santa costume. It just so happened that we had an old red sheet lying around that I could use for the material. So, I decided to whip something together. Here's what I came up with:


For the shirt of the suit, I used this free art smock pattern. I didn't add any embellishments, I just used the basic pattern for the sleeves and body of the shirt. I left out the elastic bands in the wrists of the smock and just hemmed the wrists regularly.

For the bottoms, I just followed a basic pajama pants tutorial to sew some pants. I used my son's own pants as a pattern and it was very easy.

Then we just added a belt, rain boots, and hat that we already had, and my son was one happy Santa. He loved it and wore the outfit almost every day all Christmas season.

If you want to go all out, you could also take these basic ideas and expand, adding faux fur around the cuffs of the sleeves. But as this was a spur-of-the-moment project, and my 3-year-old didn't complain, I just left it as it was, a simple red suit made from an old sheet.

-->

3.19.2012

Easy homemade wooden play food

My kids got a play kitchen for Christmas, and they are loving it. They have a lot of plastic fruits and vegetables, but I wanted some to add some other food to our play kitchen. So I was excited when I found this tutorial (along with free printable labels) to make some wooden play food for my kids' play kitchen. Here is what I made. It was so simple--I finished it in one evening using scrap wood from our garage. (I just used regular mod podge, so I didn't have to wait weeks for it to cure as the author of the tutorial did). My kids especially love the Oreos and goldfish!

3.10.2012

DIY Magnetic Chalkboards and Desk

There is something so satisfying in having created something with your own hands. I love some of the DIY projects I have found via Pinterest.  One project I fell in love with was a fold-down chalkboard/desk. What a great way to save space and create a little work area for your child! So, using the tutorial here, I created my own version of that desk. I completed that project this week.
We had a lot of scrap wood and hardware on hand, so I just had to buy the paint for the project. I made a few alterations to the design in the tutorial to simplify it. I made the desk slightly smaller so I wouldn't have to buy additional wood other than what I had on hand. And I omitted the paper roll and the trim (once again to simplify it and because I wanted to create it using mostly what I had on hand). I did make one addition--I bought magnetic primer to turn the chalkboard into a magnetic chalkboard. That opened up a lot of possibilities because now we can use it for storytelling, spelling with our magnetic letters, and more. (The cute five little monkeys magnet printables are from this website.)  And one change I did make after I took these pictures was to add a support hinge inside. The chains were just not quite strong enough by themselves. I am definitely a novice when it comes to building with wood, so even though it isn't perfect, I was happy with how my desk turned out.

Then, using some of the leftover plywood and paint from the fold down desk, I decided to make lap-sized magnetic chalkboards for my boys. I cut the boards slightly larger than a piece of paper so they can do magnet sheets such as these from Making Learning Fun. My boys love having their own lapboards to write and play with. My older boy often gets frustrated when he doesn't draw things just the way he wants to, so using dry-erase boards, chalkboards, and his Magnadoodle have all been great ways for him to have fun drawing without getting frustrated because he can easily wipe away his pictures or letters and try again.

Here are the instructions for the lap-size magnetic chalkboard:

Supplies
*circular saw
*sandpaper
*plywood
*magnetic primer
*chalkboard paint

Instructions
*Use a saw to cut a plywood to desired size. I cut my plywood to 10.5 by 13 inches (just a couple of inches larger than a standard-sized piece of paper). I made two boards, one for each of my boys.
*Sand down plywood until it is smooth.
*Coat with magnetic primer. Be sure to mix the primer well, and use a paint roller for a smoother finish. I used three coats of magnetic primer for a strong base.
*Paint with chalkboard paint and sand down as desired. I used three coats of chalkboard paint. I lightly sanded the board between coats.
*Allow the chalkboard paint to cure and prep the chalkboard per instructions on the back of the paint can.
*Have fun with your magnetic chalkboard!

Magnetic Primer is expensive (about $20 for a can), so if you aren't using it for other projects as well, it might be cheaper to just paint an old cookie tray with chalkboard paint to get a similar effect. But since I had magnetic primer from my desk project, it worked well for the lap-boards. In total, I used about half of a can of magnetic primer for the fold down desk and lap-boards. If I owned my house and were able to paint my walls, I would love to use some of my leftover magnetic primer and chalkboard paint to do a whole wall

2.10.2012

Homemade Bean Bag Board

 A simple, inexpensive gift I made for my little girl's first birthday were these bean bags and bean bag board. The bean bags took very little fabric, and I used scrap wood and paints that I already had laying around for the board, so it didn't cost much more than my time. But it was a huge a hit. She loved putting the bean bags through the holes in the board!

To make the board, I simply painted a piece of scrap wood with the design I wanted, and then I had my husband use his jigsaw to cut three holes that were slightly bigger than the bean bags. I just lean the board up against a wall, so I didn't create any sort of stand for it. It is also much easier to store when it is completely flat.

To make the bean bags, I began by cutting out two squares  for each bean bag. I just made the squares slightly larger than I wanted the final bean bags to be to allow for a seam. On one square of each set, I appliqued one of the letters to my daughter's name. You could applique letters, numbers, or designs, or you could leave the bean bags blank. I thought it would be fun to do the letters of her name so we could use the bean bags later when I teach her to spell her name. Here is a tutorial on how to applique. After I finished with the letters, I sewed the sets of squares for each bean bag together (right sides together), leaving a small opening to flip the bean bags right side out. I left enough of an opening to allow me to then easily scoop in beans to fill the bean bag. Once the bean bags were full enough, I sewed the opening shut. Here is the finished product! As I said, my little girl couldn't have been happier with them...

2.04.2012

Homemade Doctor Kit and Coat

My kids love to play make believe, and so I decided to give them a play doctor kit for Christmas. However, as I searched around, I found that many of the doctor kits were really small and cheap, and the highly rated sets were quite expensive for what they offered. So, I was inspired by this post to make my own kit. For the main part of the kit, I used a black carrying case that used to hold my husband's hair clippers. I then went to the dollar store and found a lot of treasures--an ace bandage, an ankle brace, face masks, a small flashlight, and an ice pack. Most of the rest of the items I used were items I already had around the house--extra medicine droppers, an old thermometer, empty medicine bottles from which I removed the labels and then filled with sparkly pom-poms... I then made a few things to add to the kit. I found a picture of a band-aid and copied a whole page of that picture onto mailing labels using my word processing software. I then printed a page of these "band-aid" stickers. I printed and laminated the x-ray cards from the blog Chasing Marcus, though it doesn't look like those printables are available to the public anymore. A simple google image search should yield plenty of images of x-rays that you could print, or you could purchase x-rays like Amazing X-rays: The Human Body online. I also printed out and laminated an eye chart. Several different choices of eye charts can be found here. To finish my kit, I did spring for one real "doctor item" online--a stethoscope. I purchased a real stethoscope from Amazon.com.

It was surprisingly inexpensive for the quality. My kids love playing with it, listening to heartbeats and breathing. And I have even pulled it out for my own real-life use to listen to my children's breathing on nights when they are sick with croup or bad colds.

In addition, I re-purposed an old white shirt to make a lab coat. I hemmed it a bit and then took a sharpie and  printed a name on the pocket.
We have been having a lot of fun playing make believe "doctor" with this costume and kit. For more fun doctor-related play, see also our "x is for x-ray" pre-school unit.


-->

2.03.2012

No-Sew Tutu and Matching Headband

This year for Christmas, I made dress-up costumes for each one of my children. For my one-year-old girl, I had fun making this easy no-sew tutu and matching headband.
 The instructions for the tutu are found here. I found this shortcut on Pinterest to easily cut the tulle. I bought the tulle, ribbon, elastic, and fake cherry blossom branch all at Walmart and the project only cost me around $5. Even more importantly, I was able to easily finish it in just over an hour. Time is precious when you have three young children!
To make the headband, I simply covered a plain plastic headband (I bought a pack of headbands at the 99 cent store) with brown ribbon, and then I hotglued fake cherry blossoms and some layered circles of tulle (just slightly larger than the blossoms) onto the headband.

11.05.2011

Re-purposing Worn-out Clothes

Re-purposing Worn-out Clothes
Written by Rachel Hoggan

After I had two boys, I was thrilled to have a girl whom I could dress up in a different way. I have made some of my own very simple creations for my daughter using scraps of fabric. All of the bows in this collage were re-purposed scraps from (1) an old blouse, (2) an old pair of jeans, (3) leftover scraps from sewing a bridesmaid dress, (4) lining of an old skirt. None of the clothes I cut up were in a condition to give away because they were too worn or stained, so I was happy to be able to recycle the fabric, save money, and make fun accessories for my little baby girl. 

Depending on your style, you can easily find inspirations online for creating your own fabric flowers which you can put on clips or headbands. This post has a round-up of some great online tutorials for fabric flowers. Not being an expert sewer, I personally like doing a simple box-fold type flower or layering petals with singed edges. I invested in one small bag of seed pearls at the fabric store, some plain hair clips (Clips Metal Single Prong 80 Count), and some lingerie elastic to attach to my completed fabric scrap flowers.

*On a separate note, another thing I have done with scraps from old clothes is create a Montessori fabric matching game. I cut up different fabrics--having two of each type of fabric. Then, I blindfold my child and have him feel the fabric to find the matches. I start by handing him two pieces at a time and asking him if they are the same or different. I do this several times until he can confidently answer each time. Then, he progresses to having the whole set of fabric and pairing the matches on his own. Fabric matching is an excellent sensory activity that my boys love to do.
-->